Queries, Searches, & Data
Enter Query & Execute Query Modess
The eQuinox application runs in two modes; Enter Query and Execute Query. The Enter Query Mode, invoked by hitting F7, is clears the screen and allows the user to enter information by which they want to search. For example, in the Client Maintenance screen, if the user wants to find all existing Clients with a Client Status of 1 (Clients under whom new files can be opened), they would enter "1" in the Client Status field. Once the search criteria is entered, the user can then hit F8, which invokes the Execute Query mode, and the related information will be returned. If no information relating to the query is found, a message in the status bar will read "Query caused no records to be retrieved, Re-Enter". The user must then enter new search criteria.
To view all existing information, the user can simply hit F8 (Execute Query) upon entrance to the screen.
Lists Of Values
Many fields in eQuinox house Lists of Values. A List of Values is a list of valid options that the user must make a selection from to fill the field with the proper information. The user cannot manually enter information other than the List of Values options into such fields.
A List of Values is indicated by the List of Values button (small button found on the right of the field), and by a message in the status bar that reads "List of Values Available". The user can access the List of Values by either clicking the List of Values button or by hitting the F9 key. Once a selection from the list is made, the user must click the Ok button and the information will be displayed in the field.
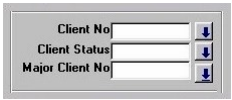
In the screen shown here, all three fields are Lists of Values, indicated by the button with the blue arrow (the List of Values button). Lists of Values can also be accessed by hitting the F9 key.
Once the user activates the List of Values, the valid values for that field are displayed, as shown here. To make a selection, the user may double-click the list item, or highlight the item and then click the Ok button.
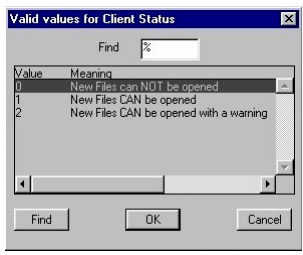
To search the list for a specific item, the user can enter the name or partial name of the item in the Find field. For example, if the user wishes to find value "1" in the List of Values shown here, they would enter "1" in the Find field and then hit the Find button.
To cancel a selection from a List of Values, the user can simply click the Cancel button.
Lookup Forms
Similar to the List of Values, eQuinox contains another form of query called a Lookup Form. The Lookup Form allows the user to view all possible entries for a particular field. The Lookup Form is indicated by the same button used with Lists of Values. Look-Up forms can also be accessed by pressing the F9 key.
Note: The Look-Up forms display information according to a specific sort order. When sorting by Client or Matter name, the sort order is as follows: alphabetically by last name, all upper case before lower case. When sorting by Client or Matter number, the sort order is as follows: numerically, numbers padded with zeros first (i.e. 0001 comes before 1); alphabetically, unique identifiers consisting of all letters come at the end of those with numbers with the same number of characters (i.e. ABC comes after 123 and 999, ABCD comes after 1234 and 9999); those with a combination of letters and numbers come at the end of those consisting of all letters with the same number of characters (i.e. TP3 comes after ABC, K899 comes after ABCD). Also, with those consisting of letters, all upper case comes before all lower case.
The Client Lookup Form
The Client Lookup Form is available for any field that requires the user to either enter or select just the Client Number and/or Name (i.e. this form does not appear when the user must enter or select both the Client and the Matter).
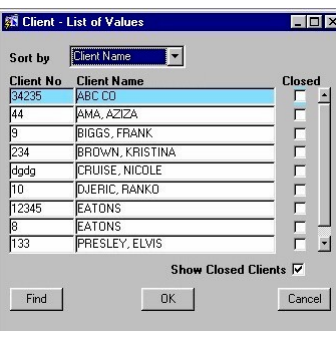
For example, in the Maintain Client Information routine, when the user clicks the List of Values button by the Client field, they are presented with the Lookup Form seen here. When the user clicks the Find button on the bottom of the Lookup Form, all Client Names are displayed. The user can then make their Client selection from the information returned.
Sort By
The information displayed in the Lookup Form can be sorted by either Client Name or Number. The user may make a selection from the drop-down list provided.
As soon as a selection is made, a query is executed based on the sort order.
Client No
The unique identifier for the current Client.
Sort Name
The name for the current Client.
Closed
The Yes/No (checked/unchecked) value of this field indicates whether or not the current Client's file is closed. A Client's file cannot be closed if they are associated with active matters. To include Client's with closed files in the information displayed, the Show Closed Clients field must be checked.
Note: A Client's file is marked as 'closed' through the Maintain Client Info routine (ie. Closed Date field).
To make a selection, the user may double-click the Lookup item, or highlight the item and then click the Ok button. To cancel a selection from a Lookup Form, the user can simply click the Cancel button.
The Matter Lookup Form
The Matter Lookup Form includes both Client and Matter information, as seen below, and is available for every field that requires the user to either enter or select a Matter Number and/or Name. This Lookup Form displays all Clients, and all Matters for each Client. To view closed Matters as well, the user must 'check' the Show Closed Matters check box.
Note: In forms where the Matter field follows the Client field, if the user accesses this form from the Client field and makes their selection, only the Client number will be displayed. However, if the user tabs through the Client field to the Matter field and then accesses this form and makes their selection, both the Client and Matter numbers will be displayed.

Context Client
This field is used when the selection of a Matter is based on a specific Client (i.e. all Matters displayed are in context of this specific Client). For example, when a Client field immediately precedes a Matter field, if the user selects or enters the Client number and then accesses this form from the Matter field, only those Matters associated with the current Client will be displayed. The Client Number and Name will be displayed automatically.
Sort By
The information displayed in the Lookup Form can be sorted by either Client Number, Client Name, Mater Number, or Matter Name. The user may make a selection from the drop-down list provided. As soon as the selection is made, a query is executed based on the sort order.
Client No, Client Name
The unique identifier and name of the current Client.
Matter No, Matter Name
The unique identifier and name of the Matter associated with the current Client.
Closed
The Yes/No (checked/unchecked) value of this field indicates whether or not the current Matter is closed. To include closed Matters in the information displayed, the Show Closed Matters field must be checked.
Soft Closed
The Yes/No (checked/unchecked) value of this field indicates whether or not the current Matter is soft closed.
To make a selection, the user may double-click the Lookup item, or highlight the item and then click the Ok button. To cancel a selection from a Lookup Form, the user can simply click the Cancel button.
Dates
All date fields in eQuinox house a calendar from which the user can select the appropriate date. This feature eliminates the problem of dates being entered in the wrong format, as well as offering the convenience of easily being able to look up past and future dates. If the user manually enters the date in the wrong format, a message will be displayed detailing the error.

Calendars are indicated by the same button used with Lists of Values. When the user clicks this button, the calendar is activated. The user can also activate the calendar by pressing the F9 key.
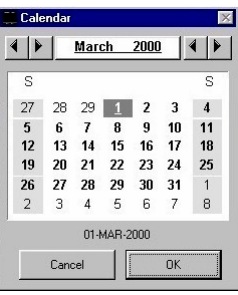
Once the calendar appears, the user may click on the desired date and then click the Ok button. The selected date will then be displayed in the field in the proper format. The user may use the scroll buttons at the top of the calendar to change months and years.
To cancel a selection from a calendar, the user can simply click the Cancel button.
Note: Proper date format in eQuinox is DD-MON-YYYY.
Validation
eQuinox is fully validated to prevent data from being entered incorrectly. Number fields will not allow the entry of letters, fields holding essential information are non-editable, dollar fields are automatically reformatted, etc. If the user not knowingly attempts to enter information incorrectly, they will be notified with a message detailing the error.